SpringBoot 2.x+Shiro+Redis
一直想好好的学习一下安全方面的框架,自己对于这个方面的知识很欠缺,借助当前公司项目的机会,认真的研究了两天Shiro这个高度可定制的框架(虽然在Spring Boot中集成Spring Security更为方便,但是看了一天的相关资料,感觉还是Shiro更简单,以后再认真学习Spring Security)。
项目数据库使用的是MongoDB,稍后使用MySQL做一个集成,毕竟用到MongoDB的不多,其实都是大同小异,不过在SpringBoot中使用MongoDB特别方便。
1 准备
Spring Boot 2.x
Shiro
Redis
Maven 3.6
JDK 1.8
IDEA
2 Shiro介绍 直达官网:http://shiro.apache.org
Shiro中四大模块如图:
Authentication,身份证认证,一般就是登录
Authorization,授权,给用户分配角色或者访问某些资源的权限
Session Management, 用户的会话管理员,多数情况下是web session
Cryptography, 数据加解密,比如密码加解密等
Shiro权限控制流程及相关概念(http://shiro.apache.org/architecture.html ),其中:
Subject:主体,如用户或程序,主体去访问系统或者资源
SecurityManager:安全管理器,Subject的认证和授权都需在安全管理器下进行
Authenticator:认证器,主要负责Subject的认证
Realm:数据域,Shiro和安全数据的连接器,类似于jdbc连接数据库; 通过realm获取认证授权相关信息,在集成时这个部分需要重写Shiro指定的方法
Authorizer:授权器,主要负责Subject的授权, 控制subject拥有的角色或者权限
Cryptography:加解密,Shiro中包含易于使用和理解的数据加解密方法,简化了很多复杂的api
Cache Manager:缓存管理器,比如认证或授权信息,通过缓存进行管理,提高性能
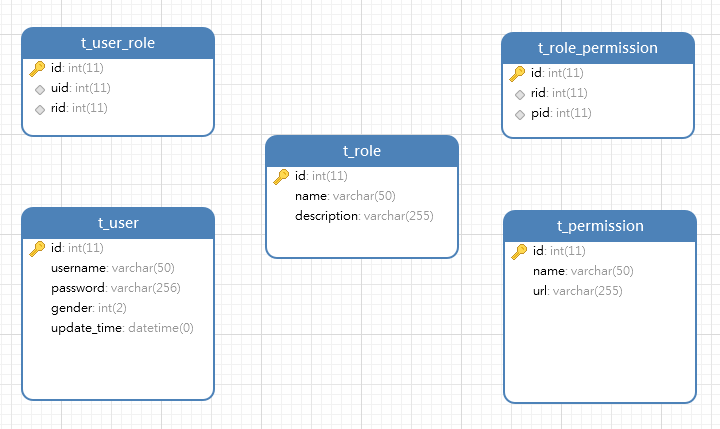
3 集成Shiro 3.1 数据库设计
3.2 创建项目 使用IDEA创建一个空的Spring Boot项目,勾选相关web依赖和数据库依赖,这里把相关依赖全部罗列出来
1 2 3 4 5 6 7 8 9 10 11 12 13 14 15 16 17 18 19 20 21 22 23 24 25 26 27 28 29 30 31 32 33 34 35 36 37 38 39 40 41 42 43 44 45 46 47 48 49 50 51 52 53 54 55 56 57 58 59 60 61 62 63 64 65 66 67 <properties > <java.version > 1.8</java.version > <shiro-spring.version > 1.5.1</shiro-spring.version > <shiro-redis.version > 3.2.3</shiro-redis.version > <druid.version > 1.1.20</druid.version > <fastjson.version > 1.2.67</fastjson.version > <mybatis-plus.version > 3.3.0</mybatis-plus.version > </properties > <dependencies > <dependency > <groupId > org.springframework.boot</groupId > <artifactId > spring-boot-starter-web</artifactId > <exclusions > <exclusion > <groupId > org.springframework.boot</groupId > <artifactId > spring-boot-starter-json</artifactId > </exclusion > </exclusions > </dependency > <dependency > <groupId > com.alibaba</groupId > <artifactId > fastjson</artifactId > <version > ${fastjson.version}</version > </dependency > <dependency > <groupId > mysql</groupId > <artifactId > mysql-connector-java</artifactId > </dependency > <dependency > <groupId > com.alibaba</groupId > <artifactId > druid</artifactId > <version > ${druid.version}</version > </dependency > <dependency > <groupId > com.baomidou</groupId > <artifactId > mybatis-plus-boot-starter</artifactId > <version > ${mybatis-plus.version}</version > </dependency > <dependency > <groupId > org.apache.shiro</groupId > <artifactId > shiro-spring</artifactId > <version > ${shiro-spring.version}</version > </dependency > <dependency > <groupId > org.crazycake</groupId > <artifactId > shiro-redis</artifactId > <version > ${shiro-redis.version}</version > <exclusions > <exclusion > <groupId > org.apache.shiro</groupId > <artifactId > shiro-core</artifactId > </exclusion > </exclusions > </dependency > <dependency > <groupId > org.projectlombok</groupId > <artifactId > lombok</artifactId > <optional > true</optional > </dependency > </dependencies >
3.3 配置application.yml文件 配置数据库连接相关信息
1
2
3
4
5
6
7
8
9
10
11
12
13
14
15
16
17
18
19
20
21
22
23
24
25
spring: datasource: type: com.alibaba.druid.pool.DruidDataSource driver-class-name: com.mysql.cj.jdbc.Driver url: jdbc:mysql://localhost:3306/db_role?useUnicode=true&characterEncoding=utf-8&useSSL=false&serverTimezone=UTC username: db_role password: db_role redis: database: 1 host: 192.168 .213 .146 port: 6379 password: coctrl timeout: 0 jedis: pool: max-active: 8 max-idle: 8 max-wait: -1ms min-idle: 0 mybatis-plus: configuration: log-impl: org.apache.ibatis.logging.stdout.StdOutImpl
3.4 集成mybatis-plus 3.4.1 entity 实体类与数据库一一对应就行,可以配合mybatis-plus直接自动生成
3.4.2 mapper
只写了一个用于登录是通过用户名查对应信息的方法
1
2
3
4
5
6
7
8
9
@Component public interface UserMapper extends BaseMapper <User> { UserVO findUserInfoByUsername (String username) ; }
UserVO是一个自定义的实体类,用于封装用户、角色、权限信息,具体可以看项目源码
1
2
3
4
5
6
7
8
9
10
11
12
13
14
15
16
17
18
19
20
21
22
23
24
25
26
27
28
29
30
31
32
33
34
35
36
37
38
39
40
41
42
43
44
45
46
<?xml version="1.0" encoding="UTF-8" ?> <!DOCTYPE mapper PUBLIC "-//mybatis.org//DTD Mapper 3.0//EN" "http://mybatis.org/dtd/mybatis-3-mapper.dtd" > <mapper namespace ="com.kangaroohy.shiroredis.mapper.UserMapper" > <resultMap id ="userInfoMap" type ="com.kangaroohy.shiroredis.domain.entity.vo.UserVO" > <id property ="id" column ="u_id" /> <result property ="username" column ="u_username" /> <result property ="password" column ="u_password" /> <result property ="gender" column ="u_gender" /> <result property ="updateTime" column ="u_updateTime" /> <collection property ="roleList" ofType ="com.kangaroohy.shiroredis.domain.entity.vo.RoleVO" > <id property ="role.id" column ="r_id" /> <result property ="role.name" column ="r_name" /> <result property ="role.description" column ="r_description" /> <collection property ="permissionList" ofType ="com.kangaroohy.shiroredis.domain.entity.po.Permission" > <id property ="id" column ="p_id" /> <result property ="name" column ="p_name" /> <result property ="url" column ="p_url" /> </collection > </collection > </resultMap > <select id ="findUserInfoByUsername" resultMap ="userInfoMap" > SELECT u.id u_id, u.username u_username, u.password u_password, u.gender u_gender, u.update_time u_updateTime, r.id r_id, r.name r_name, r.description r_description, p.id p_id, p.name p_name, p.url p_url FROM t_user u LEFT JOIN t_user_role ur ON ur.uid = u.id LEFT JOIN t_role r ON r.id = ur.rid LEFT JOIN t_role_permission rp ON rp.rid = r.id LEFT JOIN t_permission p ON p.id = rp.pid WHERE u.username = #{username} </select > </mapper >
3.4.3 service 这个地方就是一个简单的调用mapper中的方法,具体可以看源码
不要忘记启动器类配置mybatis的mapper扫描路径,这个集成mybatis-plus的时候应该有配置
1 @MapperScan("com.kangaroohy.shiroredis.mapper")
3.5 配置Shiro 3.5.1 自定义Realm:CustomRealm.java 1 2 3 4 5 6 7 8 9 10 11 12 13 14 15 16 17 18 19 20 21 22 23 24 25 26 27 28 29 30 31 32 33 34 35 36 37 38 39 40 41 42 43 44 45 46 47 48 49 50 51 52 53 54 55 56 57 58 59 60 61 62 63 64 @Slf4j public class CustomRealm extends AuthorizingRealm { @Autowired private UserService userService; @Override protected AuthorizationInfo doGetAuthorizationInfo (PrincipalCollection principalCollection) { UserVO user = (UserVO) principalCollection.getPrimaryPrincipal(); log.info("用户 {} 调用了 doGetAuthorizationInfo 进行授权" , user.getUsername()); UserVO info = userService.findUserInfoByUsername(user.getUsername()); Set<String> stringRolesList = new HashSet <>(); Set<String> stringPermissionsList = new HashSet <>(); List<RoleVO> roleList = info.getRoleList(); for (RoleVO role : roleList) { stringRolesList.add(role.getRole().getName()); List<Permission> permissionList = role.getPermissionList(); for (Permission permission : permissionList){ if (permission != null ){ stringPermissionsList.add(permission.getName()); } } } SimpleAuthorizationInfo simpleAuthorizationInfo = new SimpleAuthorizationInfo (); simpleAuthorizationInfo.addRoles(stringRolesList); simpleAuthorizationInfo.addStringPermissions(stringPermissionsList); return simpleAuthorizationInfo; } @Override protected AuthenticationInfo doGetAuthenticationInfo (AuthenticationToken authenticationToken) throws AuthenticationException { String username = (String) authenticationToken.getPrincipal(); UserVO info = userService.findUserInfoByUsername(username); String password = info.getPassword(); if (password == null || "" .equals(password)) { return null ; } ByteSource salt = ByteSource.Util.bytes(username); return new SimpleAuthenticationInfo (info, password, salt, getName()); } }
Realm能做的工作主要有以下几个方面:
验证是否能登录,并返回验证信息(getAuthenticationInfo方法)
验证是否有访问指定资源的权限,并返回所拥有的所有权限(getAuthorizationInfo方法)
判断是否支持token(例如:HostAuthenticationToken,UsernamePasswordToken等)(supports方法)
自定义Realm中实现的是前两个
3.5.2 自定义SessionManager:CustomSessionManager.java 将生成的sessionId作为认证时的token,登录之后的每次请求,header中必须携带token参数
1
2
3
4
5
6
7
8
9
10
11
12
13
14
15
16
17
18
19
20
21
22
public class CustomSessionManager extends DefaultWebSessionManager { private static final String AUTHORIZATION = "token" ; public CustomSessionManager () { super (); } @Override protected Serializable getSessionId (ServletRequest request, ServletResponse response) { String sessionId = WebUtils.toHttp(request).getHeader(AUTHORIZATION); if (sessionId != null ) { request.setAttribute(ShiroHttpServletRequest.REFERENCED_SESSION_ID_SOURCE, ShiroHttpServletRequest.COOKIE_SESSION_ID_SOURCE); request.setAttribute(ShiroHttpServletRequest.REFERENCED_SESSION_ID, sessionId); request.setAttribute(ShiroHttpServletRequest.REFERENCED_SESSION_ID_IS_VALID, Boolean.TRUE); return sessionId; } else { return super .getSessionId(request, response); } } }
3.5.3 自定义sessionId生成器:CustomSessionId.java 1 2 3 4 5 6 public class CustomSessionId implements SessionIdGenerator { @Override public Serializable generateId (Session session) { return "kangaroohy" + UUID.randomUUID().toString().replace("-" , "" ); } }
3.5.4 shiro配置文件:ShiroConfig.java 1 2 3 4 5 6 7 8 9 10 11 12 13 14 15 16 17 18 19 20 21 22 23 24 25 26 27 28 29 30 31 32 33 34 35 36 37 38 39 40 41 42 43 44 45 46 47 48 49 50 51 52 53 54 55 56 57 58 59 60 61 62 63 64 65 66 67 68 69 70 71 72 73 74 75 76 77 78 79 80 81 82 83 84 85 86 87 88 89 90 91 92 93 94 95 96 97 98 99 100 101 102 103 104 105 106 107 108 109 110 111 112 113 114 115 116 117 118 119 120 121 122 123 124 125 126 127 128 129 130 131 132 133 134 135 136 137 138 139 140 141 142 143 144 145 146 147 148 149 150 151 152 153 154 155 156 157 158 159 160 161 162 163 164 165 166 167 168 169 170 171 172 173 174 175 176 177 @Configuration public class ShiroConfig { @Value("${spring.redis.database}") private Integer database; @Value("${spring.redis.host}") private String host; @Value("${spring.redis.port}") private Integer port; @Value("${spring.redis.password}") private String password; @Bean(name = "shiroFilter") public ShiroFilterFactoryBean shiroFilter (SecurityManager securityManager) { ShiroFilterFactoryBean shiroFilterFactoryBean = new ShiroFilterFactoryBean (); shiroFilterFactoryBean.setSecurityManager(securityManager); shiroFilterFactoryBean.setLoginUrl("/pub/need_login" ); shiroFilterFactoryBean.setSuccessUrl("/" ); shiroFilterFactoryBean.setUnauthorizedUrl("/pub/unauthorized" ); LogoutFilter logout = new LogoutFilter (); logout.setRedirectUrl("/pub/logout" ); Map<String, Filter> filterMap = new LinkedHashMap <>(); filterMap.put("logout" ,logout); shiroFilterFactoryBean.setFilters(filterMap); Map<String, String> filterChainDefinitionMap = new LinkedHashMap <>(); filterChainDefinitionMap.put("/logout" , "logout" ); filterChainDefinitionMap.put("/pub/**" , "anon" ); filterChainDefinitionMap.put("/user/**" , "authc" ); filterChainDefinitionMap.put("/**" , "authc" ); shiroFilterFactoryBean.setFilterChainDefinitionMap(filterChainDefinitionMap); return shiroFilterFactoryBean; } @Bean(name = "securityManager") public SecurityManager securityManager () { DefaultWebSecurityManager securityManager = new DefaultWebSecurityManager (); securityManager.setSessionManager(sessionManager()); securityManager.setCacheManager(cacheManager()); securityManager.setRealm(customRealm()); return securityManager; } public org.crazycake.shiro.RedisCacheManager cacheManager () { org.crazycake.shiro.RedisCacheManager redisCacheManager = new RedisCacheManager (); redisCacheManager.setRedisManager(redisManager()); redisCacheManager.setExpire(Constant.CACHE_EXPIRE_TIME); redisCacheManager.setPrincipalIdFieldName(Constant.ACCOUNT); redisCacheManager.setKeyPrefix(Constant.ACTIVE_SHIRO_CACHE); return redisCacheManager; } @Bean(name = "customRealm") public CustomRealm customRealm () { CustomRealm realm = new CustomRealm (); realm.setCredentialsMatcher(credentialsMatcher()); return realm; } @Bean(name = "credentialsMatcher") public HashedCredentialsMatcher credentialsMatcher () { HashedCredentialsMatcher credentialsMatcher = new HashedCredentialsMatcher (); credentialsMatcher.setHashAlgorithmName(Constant.HASH_NAME); credentialsMatcher.setHashIterations(Constant.HASH_TIME); return credentialsMatcher; } @Bean(name = "sessionManager") public SessionManager sessionManager () { CustomSessionManager sessionManager = new CustomSessionManager (); sessionManager.setGlobalSessionTimeout(Constant.SESSION_EXPIRE_TIME); sessionManager.setSessionDAO(redisSessionDAO()); sessionManager.setSessionIdCookieEnabled(false ); sessionManager.setSessionIdUrlRewritingEnabled(false ); sessionManager.setDeleteInvalidSessions(true ); return sessionManager; } public RedisSessionDAO redisSessionDAO () { RedisSessionDAO redisSessionDAO = new RedisSessionDAO (); redisSessionDAO.setRedisManager(redisManager()); redisSessionDAO.setSessionIdGenerator(new CustomSessionId ()); redisSessionDAO.setKeyPrefix(Constant.ACTIVE_SHIRO_SESSION); return redisSessionDAO; } public RedisManager redisManager () { RedisManager redisManager = new RedisManager (); redisManager.setDatabase(database); redisManager.setHost(host + ":" + port); redisManager.setPassword(password); return redisManager; } @Bean(name = "lifecycleBeanPostProcessor") public static LifecycleBeanPostProcessor lifecycleBeanPostProcessor () { return new LifecycleBeanPostProcessor (); } @Bean(name = "authorizationAttributeSourceAdvisor") public AuthorizationAttributeSourceAdvisor authorizationAttributeSourceAdvisor () { AuthorizationAttributeSourceAdvisor sourceAdvisor = new AuthorizationAttributeSourceAdvisor (); sourceAdvisor.setSecurityManager(securityManager()); return sourceAdvisor; } @Bean @DependsOn("lifecycleBeanPostProcessor") public static DefaultAdvisorAutoProxyCreator getDefaultAdvisorAutoProxyCreator () { DefaultAdvisorAutoProxyCreator defaultAdvisorAutoProxyCreator = new DefaultAdvisorAutoProxyCreator (); defaultAdvisorAutoProxyCreator.setProxyTargetClass(true ); return defaultAdvisorAutoProxyCreator; } }
3.5.5 登录用到的controller:PublicController.java 1 2 3 4 5 6 7 8 9 10 11 12 13 14 15 16 17 18 19 20 21 22 23 24 25 26 27 28 29 30 31 32 33 34 35 36 37 38 39 40 41 42 43 44 45 46 47 48 49 50 51 52 53 54 55 56 57 58 59 60 61 62 63 64 @RestController @RequestMapping("/pub") @Slf4j public class PublicController { UserService userService; public PublicController (UserService userService) { this .userService = userService; } @GetMapping("/need_login") public RestResult<String> needLogin () { return RestResult.error(RestCode.NEED_LOGIN_ERROR); } @GetMapping("/unauthorized") public RestResult<String> unauthorized () { return RestResult.error(RestCode.AUTHORIZATION_ERROR); } @PostMapping("/login") public RestResult<UserVO> login (@RequestParam String username, @RequestParam String password, HttpServletResponse response) { Subject subject = SecurityUtils.getSubject(); kickOutBefore(username.trim()); UserVO userInfo = userService.findUserInfoByUsername(username.trim()); if (userInfo == null ) { return RestResult.error("账号不存在" ); } try { UsernamePasswordToken userPwdToken = new UsernamePasswordToken (username.trim(), password.trim()); subject.login(userPwdToken); String token = subject.getSession().getId().toString(); UserVO info = userService.findUserInfoByUsername(username.trim()); info.setPassword(null ); JedisUtil.setJson(Constant.ACTIVE_SHIRO_TOKEN + username.trim(), token, Constant.ONLINE_TOKEN_EXPIRE_TIME); response.setHeader(Constant.AUTHORIZATION, token); response.setHeader("Access-Control-Expose-Headers" , Constant.AUTHORIZATION); return RestResult.ok(info); } catch (Exception e) { e.printStackTrace(); return RestResult.error("用户名或密码错误" ); } } private void kickOutBefore (String username) { String key = Constant.ACTIVE_SHIRO_TOKEN + username.trim(); if (JedisUtil.exists(key)) { String value = JedisUtil.getJson(key); if (JedisUtil.exists(Constant.ACTIVE_SHIRO_SESSION + value)) { JedisUtil.delete(key, Constant.ACTIVE_SHIRO_SESSION + value); } else { JedisUtil.delete(key); } } } }
3.6 返回JSON数据的自定义类
1 2 3 4 5 6 7 8 9 10 11 12 13 14 15 16 17 18 19 20 21 22 23 24 25 26 27 28 29 30 31 32 33 34 35 36 37 38 39 40 41 42 43 public enum RestCode { UNKNOWN_ERROR(-1 , "Unknown Error! Contact the administrator if this problem continues." ), SUCCESS(200 , "SUCCESS" ), PARAM_ERROR(400 , "Illegal Parameter!" ), NEED_LOGIN_ERROR(401 , "Please login and visit again!" ), AUTHORIZATION_ERROR(403 , "You are forbidden to view it!" ), NOTFOUND_ERROR(404 , "Not Found" ), NOT_SUPPORT_ERROR(500 , "Not support this method" ); private Integer code; private String message; RestCode(){ } RestCode(Integer code, String message) { this .code = code; this .message = message; } public Integer getCode () { return code; } public void setCode (Integer code) { this .code = code; } public String getMessage () { return message; } public void setMessage (String message) { this .message = message; } }
1 2 3 4 5 6 7 8 9 10 11 12 13 14 15 16 17 18 19 20 21 22 23 24 25 26 27 28 29 30 31 32 33 34 35 36 37 38 39 40 41 42 43 44 45 46 47 48 49 50 51 52 53 54 55 56 @Data public class RestResult <T> implements Serializable { private static final long serialVersionUID = 7711799662216684129L ; @JSONField(ordinal = 1) public int code; @JSONField(ordinal = 2) private String msg; @JSONField(ordinal = 3) private T data; public RestResult () { } public RestResult (int code, String msg) { this .code = code; this .msg = msg; } public RestResult (int code, String msg, T data) { this .code = code; this .msg = msg; this .data = data; } public static <T> RestResult<T> ok () { return new RestResult <>(RestCode.SUCCESS.getCode(), RestCode.SUCCESS.getMessage()); } public static <T> RestResult<T> ok (String msg) { return new RestResult <>(RestCode.SUCCESS.getCode(), msg); } public static <T> RestResult<T> ok (T data) { return new RestResult <>(RestCode.SUCCESS.getCode(), RestCode.SUCCESS.getMessage(), data); } public static <T> RestResult<T> error (String msg) { return new RestResult <>(RestCode.UNKNOWN_ERROR.getCode(), msg); } public static <T> RestResult<T> error (RestCode restCode) { return new RestResult <>(restCode.getCode(), restCode.getMessage()); } public static <T> RestResult<T> error (RestCode restCode, String msg) { return new RestResult <>(restCode.getCode(), msg); } public static <T> RestResult<T> error (RestCode restCode, String msg, T data) { return new RestResult <>(restCode.getCode(), msg, data); } }
4 Demo下载 无Redis缓存版本:https://github.com/kangaroo1122/ssm_shiro
有Redis缓存版本:https://github.com/kangaroo1122/shiro-redis
两个版本都可以直接下载,按照给的数据库设计,创建数据库,修改数据库地址即可运行。
用户密码加密方式:可以查看自定义Realm,这样就能自己修改数据库用户数据了
其他 关于redis的配置文件和操作redis数据库的util,可以直接查看demo源码,Redis版本还集成了mybatis-plus枚举类型转换器,具体可以看mybatis-plus的官方介绍.